Showing posts with label recipes. Show all posts

Saturday, 4 October 2014

Palestine - How I made Musakhan

Although I've cooked Arabian and Yemeni dishes before, like Kabsa and Saltah, this was my first attempt at making proper Middle Eastern food. I was spoilt for choice in terms of Palestinian dishes, but settled for Musakhan in the end, as I needed something easy after my recent experience trying to make a Mexican mole!

I looked at two different sources for inspiration - the first, a very entertaining and enjoyable book called Classic Palestinian Cuisine (2001) by Christiane Dabdoub Nasser.  Nasser tells the stories of the dishes and recounts his personal experiences, which makes this so much more than just a book of recipes!

Ground cardamom, sumac and cinnamon
If I'm being honest though, I was more influenced by the recipe in The Middle Eastern Kitchen (also 2001) by Ghillie Başan, as this recipe was a bit simpler and less labour-intensive.

I really love the format of The Middle Eastern Kitchen as it focuses on the individual ingredients and, perhaps not surprisingly, the recipe for Musakhan comes under the section on the spice called sumac.

My first time using sumac

Apart from sumac, the main flavouring for this dish, I was pretty sure I would find all of the ingredients I needed in my local area.  As it turned out, it was quite easy to find sumac as well and I think it's much more commonly available than I realised - I've just never noticed it before.

Sumac is made from dried berries and quite often sprinkled on salads or cooked meats to give them a kind of citrus flavour.  It's very tasty and I can see myself using this flavour a lot in future, as it adds a satisfying piquancy, if you don't want too much heat in your dish.

The ingredients

For the Musakhan


Musakhan ingredients
Olive oil - زيت زيتون
Butter - زبدة
2 onions - بصل
2 chicken breasts - دجاج
sumac - سماق
cinnamon - قرفة
cardamom (ground is best) - هال
1 lime - ليم
Mint - النعناع
Coriander - الكزبرة (although I decided not to use coriander in the end, as I wanted a more minty flavour)
4 pitta breads - خبز (actually it would be best to use real Palestinian bread, known as tabun which is the name of the oven it's cooked in, but I didn't have access to this, so pitta was a good substitute, especially as it's hollow inside and can be easily filled)

For the salad

2 cucumbers - خِيار
4 tomatoes - طماطم
Red pepper - فلفل حار
Yoghurt - الزبادي
Mint - النعناع
1 lime - ليم

How I made Musakhan

I started by making the salad, so I could chill it in the fridge whilst cooking the main meal.  I must admit that I'm not a massive fan of cucumber which I know sounds ridiculous, as it's probably one of the world's most inoffensive food products - I think I ate too much cucumber when I was living in Uzbekistan and it put me off!

Lovely, refreshing cucumber

Anyway, I first chopped the cucumber into chunks and mixed it with the yoghurt in a big bowl.  I then chopped up the tomatoes, pepper and mint, mixing these ingredients with the cucumber and put this in the fridge to chill.  Before taking it out of the fridge to serve with the main meal, I added lime rind and juice.

Red pepper added to cucumber and yoghurt mix

Cucumber and tomato salad
I added lime rind and juice to my salad, as well as to the main dish

To make the Musakhan I started by frying a lump of butter in some olive oil, then adding the onions and frying these until they turned a soft golden colour.

Fry the onions until they turn golden

I then added the chicken pieces and a couple of spoonfuls of sumac and stirred until the chicken had cooked through.

Add the chicken pieces and the sumac
Then I added the ground cardamon and cinnamon, along with lime rind and juice and chopped mint leaves, leaving the dish to simmer gently, only stirring occasionally,

Add the mint and spices

Let the dish simmer for about 20 minutes
As the main dish was cooking, I halved the pitta breads, opening up their central cavities before putting them in the oven for a few minutes to soften them up.

Halve the pitta bread and open the centre

A stack of pitta bread
Once the pitta breads had heated a bit, I took them out and spooned the Musakhan mixture into each piece of bread, before returning them to the oven to cook for around 8 minutes.  

Fill the pitta bread with the cooked Musakhan mixture

Bake in the oven for around 8 minutes
The end result was very yummy and the cold salad made a nice contrast to the warm bread and musakhan.  This was an easy dish to make and I'd highly recommend it!

Musakhan with salad

My Palestinian dinner
Image credits:

All images were taken by me on my trusty Canon EOS 1100D.  Feel free to re-use these images with the Creative commons license:

- Attribution (especially to this blog post)
- Non-commercial
- Share alike

Sunday, 14 July 2013

Jersey - How I made Pais au Fou and Jersey Wonders

Jersey is quite well known for its food - especially Jersey Royal potatoes - but also its cream, butter and other produce that appear in English markets quite early in the season.  A quick bit of research led me to the conclusion that the most traditional Jersey dish I could make would be Bean Crock, known as Pais au Fou in Jèrriais (literally peas in the oven), a dish that reminded me a lot of a French cassoulet or bean stew.

To be honest, it was quite an easy dish to make - the only unusual thing about it being the fact that I had to keep it in the oven for 5 hours - a terribly long time to cook anything in our fast-paced 21st century world!  I looked at several different recipes for this dish, but was mostly influenced by this one - I added carrot to the recipe, otherwise it might have been a bit too bland. 

Ingredients for Pais au Fou - Jersey Bean Crock
The ingredients

250g White haricot beans
250g mixed beans
2 onions
2 carrots
5 bay leaves
Black pepper
500g pork belly

How I made Pais au Fou

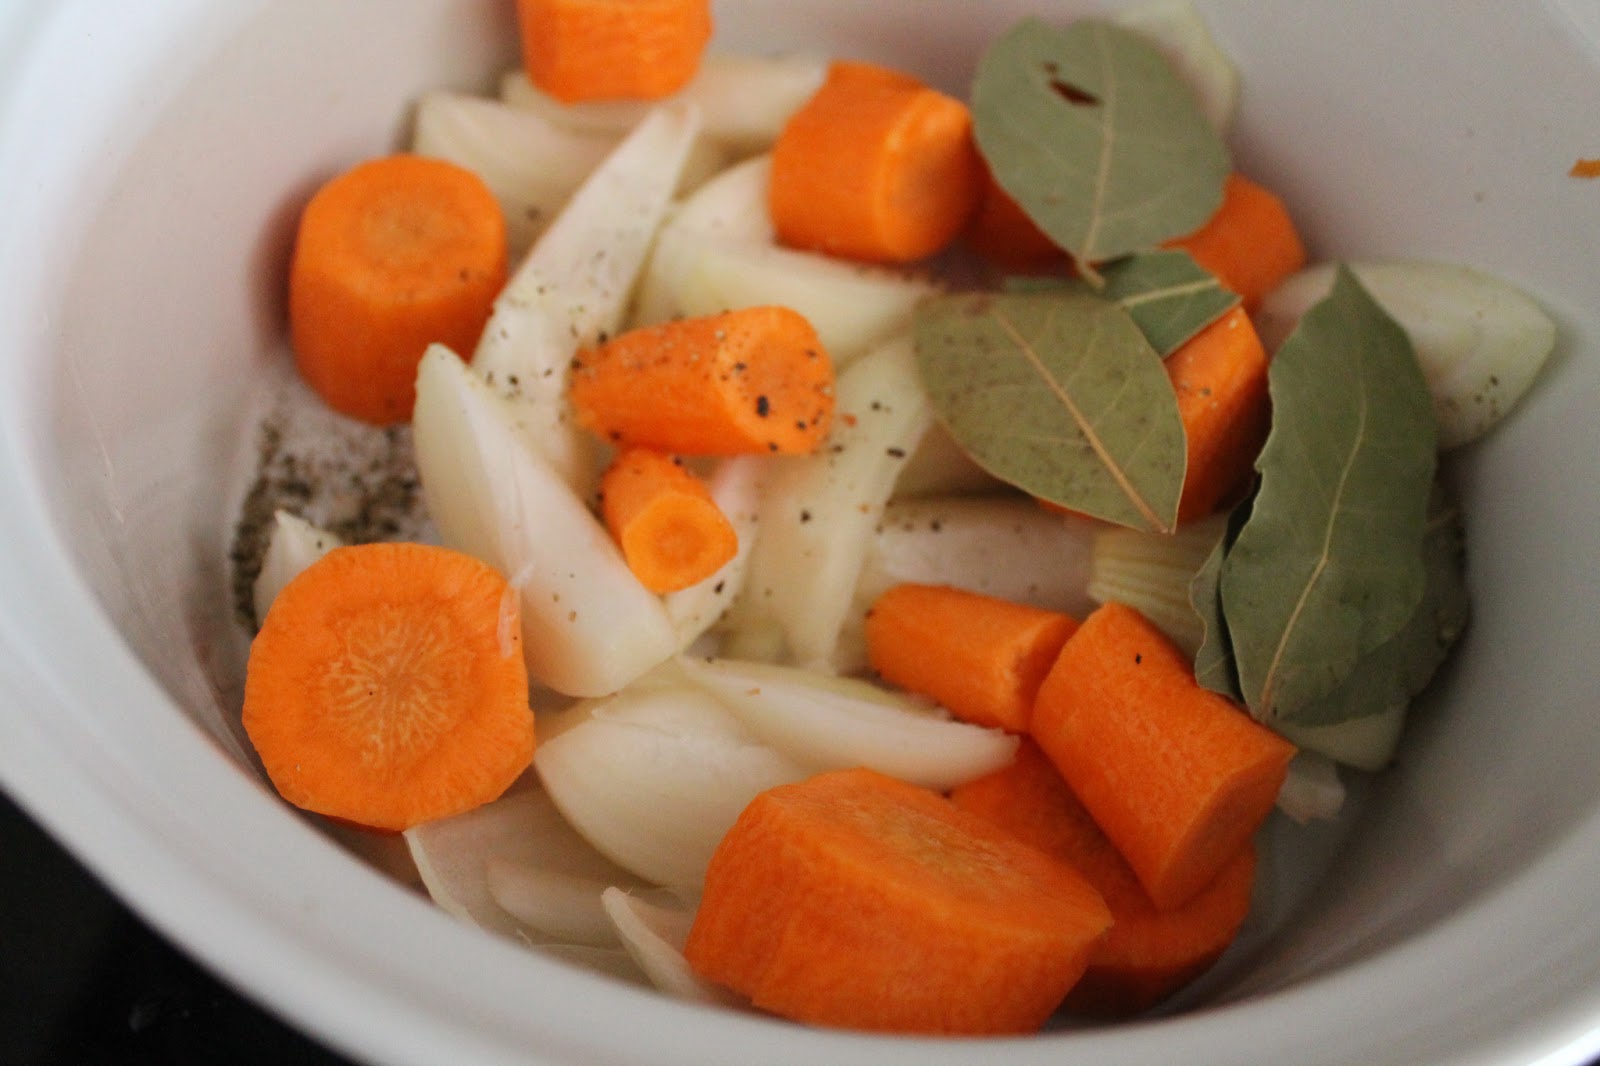
First, I chopped up the onions and carrots and put them in a large, over-proof casserole dish, topping the chopped vegetables with the bay leaves and pepper.  In Jersey, it's traditional to use a stone crock pot, hence the English name of this dish.


Chop the carrot and onion, add bay leaves and pepper

Add the pork belly pieces, including fat

Next, I chopped up the pork belly and added this to the casserole dish.  I must admit, I'm not a great fan of fat and pork belly is very fatty but, after 5 hours in the oven, the meat and fat were equally succulent and I think I actually enjoyed eating fat, for the first time in my life!

Finally, I added the beans and enough water to cover all of the ingredients.  I guess a purist would use dry beans and boil them before adding them to the casserole dish, but I opted for the easier option of tinned beans and the end result was tasty.

Add the white Haricot beans and mixed beans

Cover all ingredients with water, then put in the oven for five hours

It's a slow-cooking dish, so I left it for five hours in the oven at 150 degrees (Gas mark 2), which is quite a low heat.  I stirred the dish once an hour, to make sure nothing was sticking to the pot and that there was enough water. 

Check the pot about once an hour, to make sure it doesn't dry out

The end result was a yummy Pais au Fou served with Royal Jersey potatoes.  With all the fat and beans, it's also a good idea to serve something green on the side - I quite randomly choose rocket!

Royal Jersey potatoes
Jersey Bean crock - Pais au Fou


La Mèrvelle de Jèrri


Not content with the challenge of Jersey Bean Crock, I also decided to try my hand at making Jersey Wonders or Mèrvelles, a traditional pastry, which is quite similar to English doughnuts or French beignets

Learning how to cook something new is one thing, any idiot can do it, even me!  Learning how to bake something new is a totally different story and I found it quite challenging, although I was really happy with the end result. 

Ingredients for Jersery Wonders or Mèrvelles
I relied a lot on a recipe on the BBC's website and I also watched a video on YouTube, which helped me visualise the process for making wonders, especially how to twist the dough and give my wonders a traditional shape. 

The ingredients

500g self-raising flour
115g (4 ounces) of butter
230g (8 ounces) of caster sugar
6 eggs

How I made Jersey Wonders

I sieved the flour and caster sugar into a mixing bowl, then rubbed in the butter, which I'd cut up into small blocks.

Cut the butter into small 'blocks'

Next, I whisked the eggs in a separate bowl and slowly added the egg mixture to the bowl, mixing the whole lot together until I had a sticky, eggy paste. 

Mix the flour and sugar and work into the blocks of butter until you have a crumbly mix

Whisk the six eggs
Add the eggs to the flour/sugar/butter mix

According the recipe, you should use your hands to make small 'golf balls' from the mixture, which you put on an oven tray and cover with a damp tea-towel for two hour.

Use your hands to make several dozen 'golf balls'
Cover the balls with a damp cloth and leave for two hours

My 'balls' were slightly larger than golf balls, but it didn't really matter, as I was able to divide them in two later, to get smaller pastry shapes, more suitable to making wonders.


The next bit was probably the hardest and I used a lot of extra flour, on my hands and on the rolling pin, to roll out the balls and create an oblong shape.  On the video, I noticed that she cut three slits into the flat oblong and twisted the pastry through the middle one, so I did the same.

Use extra flower to flatten out the balls
Make an oblong shape and cut three slits in the pastry

Twist one end of the pastry through the middle slit and create a doughy shape like this
The result is a strange looking pastry mixture, that reminded me of a fleur-de-lys or a dainty woman's shoe!  I was really beginning to doubt whether or not this delicate mess would become anything edible but, luckily, in the final stage it all came together quite nicely.


The final stage involved heating up some vegetable oil in a pan and dropping the Mèrvelles into the hot oil, 5 or 6 at a time, until they became bloated and rose to the surface.  I was a bit confused by the recipe, when it said to cook the Mèrvelles on each side, when they turned golden brown. 

In my mind, I had an image of a flipping them over, on a frying pan, but I soon understood that I would have to turn the Mèrvelles over in the oil, so they would cook on each side.

Add Mèrvelles to the hot oil

When the go brown on one side, turn them over


I'm quite proud of my Jersey Wonders and enjoyed having them for breakfast with a nice cup of coffee!

Jersey Wonders or Mèrvelles


Image credits:

All photos were taken by me, please feel free to reuse, under the Creative Commons license:

Attribution (especially to this blog post)
Share alike
Non-commercial 
 

Wednesday, 23 December 2009

The Netherlands - Limburg Beef Stew with Apples

As I was learning about Limburg, I came across a really interesting website called http://www.worldcook.net/   It's available in English and Dutch, which makes me think it must be hosted by someone in the Netherlands.  Anyway, as I spent last weekend with my sister, chilling out in Leeds, I decided to cook a traditional Limburg Beef Stew with Apples.  The full recipe can be found at http://www.worldcook.net/Cooking/WorldRecipes/Limburg-recipes.htm

To be honest, it's dead easy to make, so the recipe is only really needed as a rough guide.  Something I've meant to do in the past is photo-document the entire process, so I've done this here, as a kind of experiment.

First, the ingredients.  Some beef casserole pieces, 2 or 3 onions, some nice (in my case, Irish) butter, 3 green apples, 5 cloves, 3 or 4 bay leaves and two tablespoons of sugar and of vinegar. 
For my mash, I prepared potatoes and parsnips - the parsnips weren't part of the original recipe, but I like to mash them with potato, as they give it a slightly sweeter taste.  I also added a spoonful of butter and a splash of milk to my mash to make it softer. 

The next step was to fry the meat in butter until it browned, then adding the chopped onions until they softened.  This took about 15 minutes in all.  After that I added the cloves, bay leaves, sugar and vinegar - stirring them into the mixture.  I topped this with two cups of water (I decided not to use any stock, as this wasn't in the original recipe and I think this was a good idea). 

I brought the stew to the boil and then covered and simmered it for one hour.  The original recipe says simmer the stew for two hours and then another hour with the apples in - but I decided this was too much and it still turned out really yummy.

After stewing for one hour, I prepared the apples, mixing them into the stew.  I thought the pieces (which you can see in the photo) were way too big, so I took them out again and halved them, although I'm not sure it made much difference in the end, as the apple stewed so well, it formed a kind of sauce with the liquid and spices.  I stewed the mixture with the apples for a further 45 minutes.

Whilst the apples were stewing, I boiled the potatoes and parsnips and prepared the mash, then served it all up and, although it doesn't look like much, after nearly two hours work - it sure tasted delicious!  One thing I might add next time, to see whether or not it works, is a sprinkle of cinnamon on the cooked meal, might be quite nice and I think apple and cinnamon go well together.

Image credits

The Liimburgish flag is copyright free and the photos of the Beef Stew with Apples were all taken by me.